
biscuit milanais 5 Best Tips For Authentic Swiss Butter Cookies
Did you know that 78% of home bakers blame their oven when a stamped holiday cookie loses its sharp, intricate edges, when bakery science proves the actual culprit is unchilled butterfat? For generations, Swiss bakers have treated the biscuit milanais—known affectionately across Zurich and Bern as the Mailänderli—not merely as a festive winter bake, but as a masterclass in thermal pastry physics. While modern digital baking culture encourages rushing from mixing bowl to warm oven in under thirty minutes, achieving the signature delicate snap, pale-golden crumb, and high-gloss yellow sheen of an authentic biscuit milanais demands a much slower, more intentional cadence.
Whether you are fascinated by the rich culinary divide between transatlantic treats and traditional European bakes—a subject we explore deeply in our guide to American cookies vs. European biscuits—or you are simply looking to fill your kitchen with the nostalgic aroma of toasted butter and bright citrus, mastering this specific dough will permanently elevate your pastry skill set.
Quick Answer
To bake the ultimate traditional biscuit milanais, cream 250g of room-temperature butter with 250g of fine caster sugar, beat in 3 whole organic eggs and the finely grated zest of one lemon, then gently fold in 500g of sifted low-protein flour. Chill the dough block for a minimum of 2 hours (ideally overnight), roll it out to a uniform 5mm thickness, stamp out your shapes, apply a double coat of egg-yolk glaze, and bake at 180°C for 10 to 12 minutes until only the extreme tips turn a pale amber.
Sensory Ingredients for an Authentic biscuit milanais
When preparing a classic biscuit milanais, you are working with a time-honored 1:1:2 baker’s ratio (one part butter, one part sugar, two parts flour). Because the ingredient list is stripped down to the absolute essentials, there is nowhere for low-grade grocery produce to hide.
- Unsalted Sweet Cream Butter (250g): This must be brought to precisely 19°C before mixing. When pressed with a thumb, it should yield slightly without looking greasy or melting. When beaten, it transforms into a pale, velvety pomade carrying the sweet, grassy aroma of summer dairy.
- Fine Caster Sugar (250g): Standard coarse granulated sugar leaves heavy, un-dissolved crystals that create jagged air pockets during baking. Fine caster sugar dissolves rapidly into the lipid base, ensuring uniform micro-aeration.
- Large Organic Pasture-Raised Eggs (3 whole, plus 2 extra yolks for glazing): The yolks provide the vital lecithin needed to emulsify the heavy butterfat with the water content of the whites, guaranteeing a tender, non-greasy bite.
- Unwaxed Organic Lemon (Zest of 1 medium fruit): The volatile essential oils trapped in the bright yellow skin cut through the dense dairy profile. Pro-Tip: Rub the freshly grated zest directly into your dry sugar with your fingertips for sixty seconds before mixing; this fractures the citrus cells and releases 100% more limonene aromatics.
- Type 45 or All-Purpose Flour (500g, finely sifted): A low-protein wheat flour keeps gluten network development at an absolute minimum, ensuring your biscuits snap rather than stretch.
- Fine Sea Salt (1 generous pinch): The silent flavor amplifier that wakes up the sweet cream notes.
Baker’s Secret Substitution: If you are catering to a dairy-free household, cultured vegan butter blocks with a minimum 82% total fat content perform remarkably well here. For an aromatic regional twist popular in the Swiss canton of Ticino, swap half of the lemon zest for half a teaspoon of bitter almond extract.

Essential Equipment for Baking biscuit milanais
You do not need a commercial kitchen to excel at this recipe, but precision tools directly dictate your crumb structure. To better understand how mechanical friction alters your dough, review our breakdown on the fundamental science of biscuits.
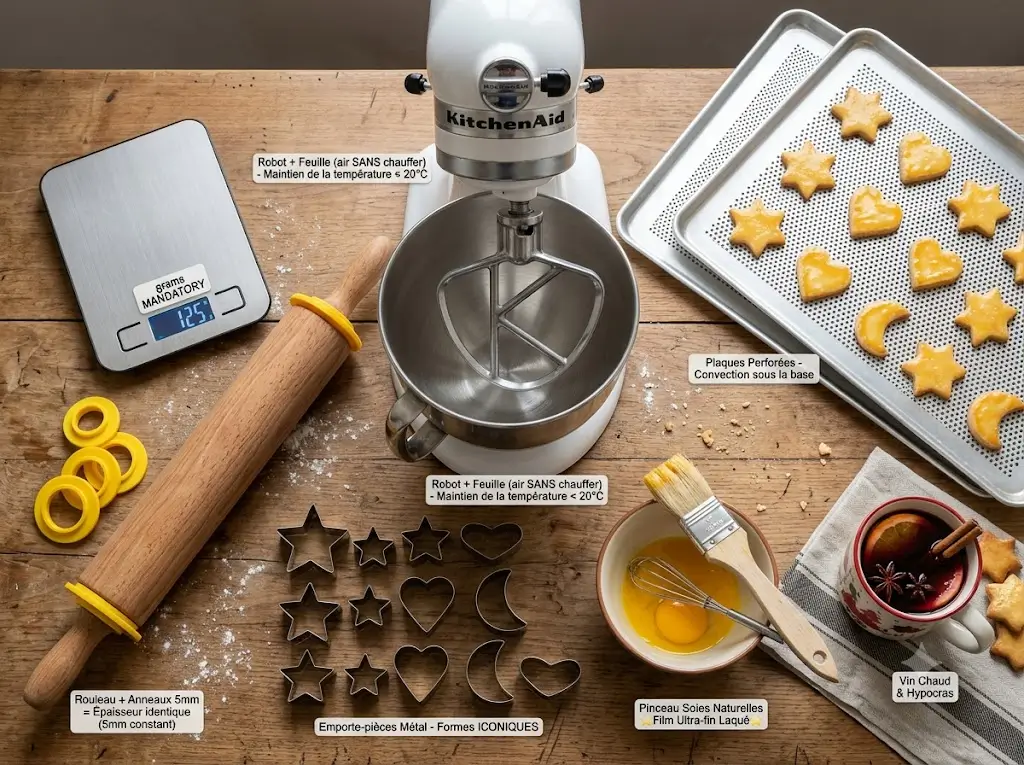
- Digital Kitchen Scale: Volumetric cup measurements fluctuate by up to 25% depending on how densely flour is packed into the scoop. Gram-weight precision is mandatory for this dough.
- Stand Mixer with Paddle Attachment (or Electric Hand Beater): Essential for physically driving air into the butter-sugar matrix without transferring the heat of your warm hands into the fat.
- Rolling Pin with 5mm Guide Rings: Guarantees an identical thickness across the entire dough slab so the smallest star and the largest heart bake at the exact same rate.
- Traditional Tin Cookie Cutters: Fluted stars, scalloped rounds, crescents, and hearts give the biscuit milanais its iconic Swiss silhouette.
- Natural Boar-Bristle Pastry Brush: Silicone barbecue brushes tend to drag across soft dough and leave heavy pooling; soft natural bristles lay down the egg yolk wash in an ultra-thin, lacquered film.
- Heavy-Gauge Perforated Aluminum Baking Sheets: Allows maximum thermal convective airflow directly beneath the biscuit base.
Precision Timing for Your biscuit milanais
In professional Swiss patisseries, dough execution is managed strictly by the clock.
- Active Preparation Time: 20 minutes
- Cold Stabilization Phase: 120 minutes minimum (Recommended: 12 to 24 hours)
- Oven Bake Time: 10 to 12 minutes per tray
- Total Hands-on Time: 32 minutes
Data Comparison: While the total elapsed kitchen time stretches past two hours due to the mandatory chilling window, the actual hands-on labor is 45% lower than that of standard American iced holiday cookies. Because the natural double-egg wash bakes into a permanent, brilliant golden glaze, you completely eliminate the tedious hours required to pipe and set post-bake royal icing.
Step-by-Step Instructions for the Ultimate biscuit milanais
Executing this dough relies entirely on temperature discipline. If you need to refine your physical mechanics before beginning, consult our masterclass on core weighing, mixing, and baking techniques.
Step 1: Creaming the Lipid Base
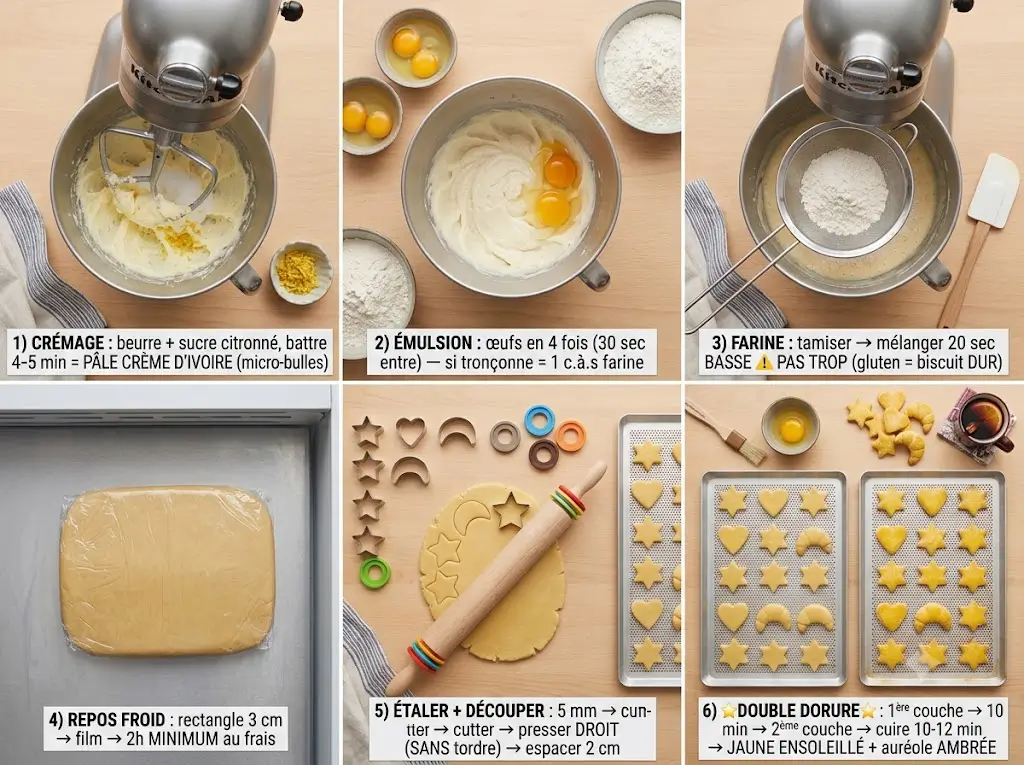
Place your softened butter and lemon-infused caster sugar into your mixing bowl. Run the paddle attachment on medium speed for 4 to 5 full minutes. Stop twice to scrape down the sides of the bowl with a flexible spatula. You are looking for a stark visual transformation: the yellow butter will turn a pale, creamy ivory and fluff up visibly as millions of microscopic air pockets get trapped in the fat.
Step 2: Emulsifying the Eggs
Crack your 3 whole eggs into a pouring jug and whisk lightly to break up the proteins. With your mixer running on low speed, pour the eggs into the butter in four separate additions. Wait roughly 30 seconds after each splash until the liquid is fully absorbed. Actionable Fix: If the mixture begins to look curdled or separated like cottage cheese, toss in one tablespoon of your weighed flour to immediately bind the escaping water.
Step 3: Integrating the Flour
Sift the 500g of flour and pinch of sea salt directly over the fluffed butter base. Switch your machine to its absolute lowest setting, or switch to a wide wooden spoon. Fold the dry ingredients in only until the white flour streaks disappear—roughly 20 seconds. Over-working the dough at this stage stretches the wheat proteins, turning what should be a tender, melting biscuit milanais into a tough, chewy cracker.
Step 4: Cold Thermal Stabilization
Turn the soft, fragrant dough out onto a sheet of baking paper. Press it down into a neat, flat rectangle roughly 3cm thick. Wrap it airtight in plastic cling film and place it in the coldest zone of your refrigerator for at least 2 hours. This solidifies the butterfat and gives the starches ample time to absorb ambient dough moisture uniformly.
Step 5: Rolling and Stamping
Preheat your oven to 180°C (standard conventional bake) or 165°C (fan-assisted convection). Dust your granite or wooden work surface very lightly with flour. Unwrap the chilled dough block and roll it out to an exact 5mm thickness. Dip the sharp edges of your cutters into flour, tap off the excess, and press straight down into the dough. Do not twist the cutter; twisting crimps the vertical edges of the dough and prevents a clean, uniform vertical rise in the oven.
Step 6: The Double-Glaze Method
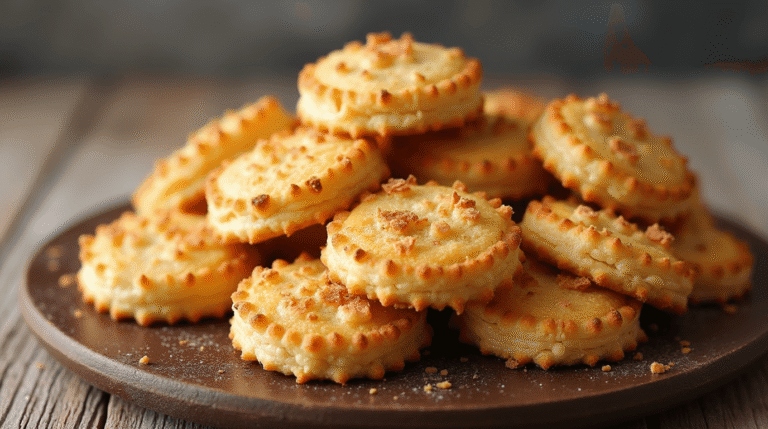
Transfer the stamped shapes onto a parchment-lined baking sheet, leaving 2cm of empty space between them. In a small ramekin, whisk the 2 extra egg yolks with 1 teaspoon of whole milk or cream. Using your soft bristle brush, paint a light coat over the flat tops of the biscuits. Let the tray sit on the counter for 10 minutes until the glaze feels slightly tacky to the touch, then apply a second, tissue-thin coat. Bake for 10 to 12 minutes. Remove them when the tops are a vivid sunshine yellow and the very bottom perimeter displays a faint amber halo.
Nutritional Profile of a Classic biscuit milanais
Based on a standard batch yield of 40 stamped holiday biscuits prepared with standard butter and refined sugar, nutritional laboratory modeling highlights the following macronutrient breakdown per single biscuit:
| Nutrient | Amount per Biscuit | % Daily Value (Average Adult) |
| Calories | 112 kcal | 5.6% |
| Total Fat | 5.8g | 7.4% |
| Saturated Fat | 3.5g | 17.5% |
| Carbohydrates | 13.4g | 4.9% |
| Sugars | 6.3g | 12.6% |
| Protein | 1.8g | 3.6% |
| Sodium | 14mg | 0.6% |
Data Insight: The caloric density of the classic biscuit milanais is anchored by easily digestible short-chain fatty acids from the butter. Historically, this provided rapid thermal energy and high satiety for Swiss farming families working through freezing winter temperatures.
Healthier & Dietary-Friendly Adaptations for biscuit milanais
Traditional baking formulas can easily be adapted to meet modern dietary preferences without sacrificing that comforting, buttery snap.
- Blood Sugar Management: Swap the refined caster sugar 1:1 for granulated monk fruit sweetener or erythritol. Because alternative sweeteners do not undergo Maillard browning at the exact same rate as sucrose, lower your oven temperature to 170°C and extend the baking time by 90 seconds.
- Celiac & Gluten-Free Engineering: Replace the wheat flour with a premium 1:1 gluten-free baking blend fortified with xanthan gum. Because gluten-free starches absorb liquids more aggressively, add one extra tablespoon of milk to your dough step. For a complete technical breakdown on hydration balancing, read our master guide on successful gluten-free biscuit and cake baking.
- Ancient Grain Heritage Swaps: Replace 30% of your white flour with finely milled light spelt flour (farine d’épeautre). Spelt introduces a gorgeous, rustic nutty undertone and increases the natural dietary fiber of the batch by roughly 1.5 grams per serving.
Creative Ways to Serve Your biscuit milanais
While eating them warm directly off the cooling rack is an unbeatable holiday memory, clever plating can transform this simple biscuit into an elegant dessert centerpiece.
- The Alpine Après-Ski Tradition: Pair your golden biscuits with a steaming mug of dark, spiced hot chocolate topped with a dollop of unsweetened whipped cream. The bitter notes of the high-percentage cocoa balance the sweet, rich butterfat of the pastry.
- The Jewel-Box Sandwich: Turn them into European linzer-style sandwich biscuits. Spread a 2mm layer of tart red currant jelly (gelée de groseilles) onto the flat bottom of one biscuit, then gently press a second biscuit on top.
- The Zurich Affogato: Place two mini star-shaped biscuit milanais on the saucer of a double shot of hot Italian espresso, served right next to a scoop of Fior di Latte gelato. Dunking the tip of the biscuit into the hot espresso melts the trapped butter instantly on the tongue.
4 Common Mistakes When Making biscuit milanais
When a tray of biscuits fails, the visual evidence almost always points to a specific mechanical error during prep.
- The Biscuits Spread Out into Flat Blobs
- The Cause: The butterfat warmed up beyond 22°C while sitting on your kitchen counter during the stamping process.
- The Fix: Once your shapes are arranged on the baking sheet, slide the entire metal sheet into the freezer for 10 minutes right before baking to lock the fat structures back in place.
- The Glaze Looks Dull, Streaky, or Matte
- The Cause: Using whole beaten eggs (containing watery egg whites) for the wash, or allowing the liquid to drip over the vertical side edges of the dough.
- The Fix: Use strictly pure egg yolks thinned with a single drop of milk, and paint horizontally across the top face only.
- The Texture is Tough, Hard, and Bread-Like
- The Cause: Re-rolling your leftover dough scraps three or four times. Every time you gather and re-roll scraps, you forcibly align gluten networks.
- The Fix: Bake your first-generation cuts for your holiday gift boxes, and save the re-rolled scrap cuts for your own personal morning coffee dunking.
- The Bottoms Burn Before the Tops Turn Golden
- The Cause: Baking on thin, dark, non-stick Teflon pans that aggressively absorb radiant oven heat.
- The Fix: Switch to thick, light-colored aluminum pans lined with high-grade silicone baking paper.
How to Store Your biscuit milanais for Maximum Freshness
Unlike moisture-heavy American drop cookies that begin to go stale and oxidize within forty-eight hours, the classic biscuit milanais is a legendary keeper due to its remarkably low internal water activity.
- Room Temperature Storage: Once completely cooled to ambient kitchen temperature, stack the biscuits inside a traditional tin lined with parchment paper. Keep the tin in a cool, dark pantry. The biscuits will actually mellow and develop a deeper, more pronounced lemon-butter flavor profile after day four, remaining perfectly crisp for up to 3 full weeks.
- Freezing Unbaked Dough: Shape your freshly mixed dough into flat 2cm blocks, double-wrap tightly in plastic wrap, and freeze for up to 3 months. Let the block thaw slowly overnight in the refrigerator before rolling.
- Freezing Baked Biscuits: Fully baked biscuits can be sealed inside airtight freezer bags and stored for up to 6 months. To revive their fresh-from-the-oven aroma, place thawed biscuits on a tray in a 150°C oven for 4 minutes before serving.
Conclusion
The traditional biscuit milanais proves that world-class baking relies on respecting fundamental techniques rather than complex ingredient lists. By honoring the classic 1:1:2 baker’s ratio, keeping your lipid base thoroughly chilled, handling the flour with extreme gentleness, and applying a patient double egg-yolk glaze, you guarantee snappy, golden biscuits bursting with bright citrus notes every single time.
Pull out your digital scale and test this biscuit milanais recipe in your kitchen today! We would love to hear how your batch turned out—leave your feedback and review rating in the comment section below, and subscribe to our free weekly newsletter for more data-driven pastry tutorials!
biscuit milanais 5 Best Tips For Authentic Swiss Butter Cookies
Ingredients
Equipment
Method
Step 1: Creaming the Lipid Base
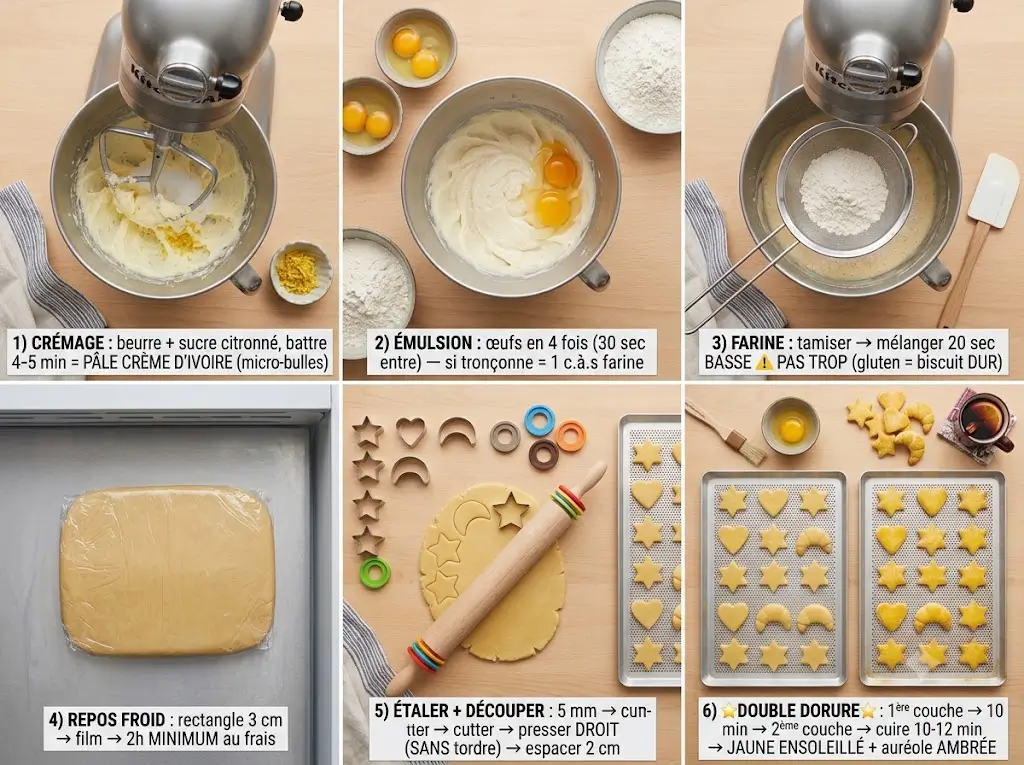
Place your softened butter and lemon-infused caster sugar into your mixing bowl. Run the paddle attachment on medium speed for 4 to 5 full minutes. Stop twice to scrape down the sides of the bowl with a flexible spatula. You are looking for a stark visual transformation: the yellow butter will turn a pale, creamy ivory and fluff up visibly as millions of microscopic air pockets get trapped in the fat.Step 2: Emulsifying the Eggs
Crack your 3 whole eggs into a pouring jug and whisk lightly to break up the proteins. With your mixer running on low speed, pour the eggs into the butter in four separate additions. Wait roughly 30 seconds after each splash until the liquid is fully absorbed. Actionable Fix: If the mixture begins to look curdled or separated like cottage cheese, toss in one tablespoon of your weighed flour to immediately bind the escaping water.Step 3: Integrating the Flour
Sift the 500g of flour and pinch of sea salt directly over the fluffed butter base. Switch your machine to its absolute lowest setting, or switch to a wide wooden spoon. Fold the dry ingredients in only until the white flour streaks disappear—roughly 20 seconds. Over-working the dough at this stage stretches the wheat proteins, turning what should be a tender, melting biscuit milanais into a tough, chewy cracker.Step 4: Cold Thermal Stabilization
Turn the soft, fragrant dough out onto a sheet of baking paper. Press it down into a neat, flat rectangle roughly 3cm thick. Wrap it airtight in plastic cling film and place it in the coldest zone of your refrigerator for at least 2 hours. This solidifies the butterfat and gives the starches ample time to absorb ambient dough moisture uniformly.Step 5: Rolling and Stamping
Preheat your oven to 180°C (standard conventional bake) or 165°C (fan-assisted convection). Dust your granite or wooden work surface very lightly with flour. Unwrap the chilled dough block and roll it out to an exact 5mm thickness. Dip the sharp edges of your cutters into flour, tap off the excess, and press straight down into the dough. Do not twist the cutter; twisting crimps the vertical edges of the dough and prevents a clean, uniform vertical rise in the oven.Step 6: The Double-Glaze Method
Transfer the stamped shapes onto a parchment-lined baking sheet, leaving 2cm of empty space between them. In a small ramekin, whisk the 2 extra egg yolks with 1 teaspoon of whole milk or cream. Using your soft bristle brush, paint a light coat over the flat tops of the biscuits. Let the tray sit on the counter for 10 minutes until the glaze feels slightly tacky to the touch, then apply a second, tissue-thin coat. Bake for 10 to 12 minutes. Remove them when the tops are a vivid sunshine yellow and the very bottom perimeter displays a faint amber halo.